Search This Blog

Wednesday, February 9, 2011

Browsing the web securely&privately

Some time ago I’ve learned that there exist pretty good google alternatives who take their responses and enable you to query the web without tracing all the moves you make. The widely defined “internet privacy” as irrelevant as it may sound is really important. And google’s attempts to record almost everything you do might become irritating at some point. If feel so, try:
http://duckduckgo.com/
http://www.startingpage.com/

Cheers

LightCatcher–Framstick creatures example

LightCatcher - Framstick genotype + neuron

author: Bartosz Kosarzycki

Introduction

The main idea behind this project was to create a framstick that could follow a flying torch in a 3-d area. The example creature however isn't able to discern three dimensions as it is limited to 2-d.
The implementation was divided into two steps:
  • designing the body structure
  • implementing neuron "brain"

Designing the body structure

The simplest body structure allowing us to follow a light in (x,y) is a simple cross with Catchlight neuron in the middle. There has to be a SeeLight neuron on each end of the four sides.
Such a genotype is presented below:
lightCatcherBody
There are neural connections from SeeLights to Catchlight neuron which acts as a command center. Every SeeLight neuron is placed exactly 2 measument units from the center. LightCatcher body was written in //f0 language of framsticks.
Body structure on 2-d plane is presented below:
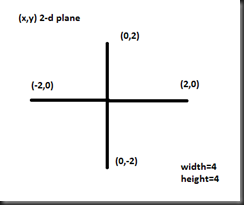
body2dPlane
This architecture has a serious flaw: when we want to move the creature across (e.g. up & left) we cannot do this as the framstick's function applyForce() applied two times in one go() function does not work as we would expect. The effect is that when we chase a light that moves in a straight line and it suddenly turns to a side we need some time to adjust our path (we will start turning left when the value from left neuron is greater than the value of top neuron.)

The Catchlight neuron

Catchlight neuron is the command center of the whole creature. This type of neuron has to be connected to 4 other Seelight neurons. If that's not the case the command center will cease to work and print an exception: "Wrong number of inputs in 'CatchLight' neuron.".
The Catchlight neuron code can be downloaded in the download section below.
We get values of all four SeeLight neurons like this:
var leftVal = Neuro.getInputState(0);
Then we get maximum values from horizontal and vertical neurons:
var halfMaxVert = Math.max(topVal, bottomVal);
var halfMaxHor = Math.max(leftVal, rightVal);
Later we decide whether to go in vertical or horizontal direction. We cannot move in both as the limitation of applyForce() forbids us that. In the end we calculate Force values to apply (in x and y axis) with the use of calcDirections() function. ThedecideToPush() decides whether to push the creature. If the function weren't there we would push the creature indifinately towards the light even if it was going in the right direction. This would cause it to gain more and more speed. Every creature in Framsticks has mass so it would be hard to change the creature's direction with that much speed gained.
If we have calculated force x,y value and decided whether to push the creature or not we can apply the force at last. This can be done like this:
middlePart.applyForce(dir[0]*vbv[0], dir[1]*vbv[1], 0);
The force is applied to the middlePart (that is where the Catchlight neuron is placed). We would expect the creature to bend and leave its SeeLight neurons behind. Fortunately there is a mode we can set in Framsticks called "ODE" which makes creatures stiff and enables the whole structure to work as we need it to.
lightCatcherInAction

The Flashlight neuron

The Flashlight neuron is used to create 'a moving torch'. It's a very simple creature that moves randomly in 2-d. It should 'run away' and be hard to catch but cannot move too fast as the LightCatcher wouldn't be able to catch up. The body is nothing more than: X[LightStill].

Debugging

The creature has extensive debugging built in. During runtime press ctrl+m in Framsticks to see the debugging messages. Example messages.out can be gotten from downloads section.

Downloads

Catchlight.neuro
Flashlight.neuro
LightCatcher.body
LightCather.expt
messages.out

All the above files: here

Instructions on Framsticks environment usage

To use this creature in Framsticks do the following:
  • copy Catchlight.neuro and Flashlight.neuro to: $FramsticksMainDirectory$/scripts
  • copy LightCatcher.expt to the main Framsticks directory
  • disable gravity in Framsticks
  • change initial elevation of framsticks to 0 (Experiment - Parameters)
  • change the world simulation engine to "ODE" (it's set to "MechaStick" at default)
  • it's not neccessary but it's better to set Experiment - Parameters - Initial placement to "Central" and initial orientation to "Always 0 degrees"
You can open the experiment by pressing ctrl+O and selecting LightCatcher.expt file. It has preset "world parameters" so the experiment works out-of-the-box and there is no need to set anything. Now place a creature called 'Light catcher' on the plane by selecting it in gene pool and pressing ctrl+alt+s. Place 'moving still-emiting flashlight' in the same manner and start the simulation.


Link to Framstick Environment:
http://www.framsticks.com/a/al_download

Tuesday, February 8, 2011

VirtualBox Cloner has become OPEN SOURCE

I'm proud to announce that VirtualBox 4.0 Cloner is now open source :)!!!

project home page is located at:
http://sourceforge.net/projects/vboxcloner


Project thread:
http://kosiara87.blogspot.com/2011/01/virtualbox-40-machine-cloner.html

Happy cloning :)

Monday, February 7, 2011

Broken hard drive sound

Do you want to be an expert on drive failure in just 10 seconds?Smile
Here’re some drive failure noises you can here in Data Recovery lab. Various producers like: Western Digital, Seagate and Samsung are attached.

http://datacent.com/hard_drive_sounds.php

Sunday, February 6, 2011

CUPS – installing HP LaserJet 1100 on Windows 7 x64

There are two problems to begin with:
a) Microsoft has deleted old drivers from Windows 7 at default
b) CUPS is not recognized by automatic Windows 7 network printer search

When I tried to install the HP LaserJet 1100 the normal way Windows 7 didn’t want to install drivers for x86 (the only one I had). I didn’t have “Windows Update” option/button HP suggested me to use.

Then I learned about “Print Management” which resolved the issue.

CUPS is “Common Unix Printing System”

CUPS

The procedure is:

  • Open “Print Management” (start->type: “Print Management”)
  • Navigate to Print Servers->your_print_server->Drivers
  • right-click in the open tab and choose “add driver”

PrintManagement

  • Click next
  • Select ONLY x64 architecture (if you select both you won’t have Windows Update button!)
  • Click Windows Update Button
  • WAIT – about 3 minutes (yeaahhh!) Smile
  • This process takes a lot of CPU time

CPU_Stress

  • Select HP –> HP Laser Jet 1100

Adding

  • You have a 64bit printer driver!

NewList

Now install printer from CUPS:

  • Open printers (search->type “printers”)
  • right-click –> add printer
  • choose a “network printer”
  • and then “select a printer by name”
    http://192.168.1.66:631/printers/HP_LaserJet_1100

    This address contains CUPS port (631) and printer name (HP_LasertJet_1100) – your address might be (and probably will) be different.
  • Wait for a connection
  • Select newly installed x64 driver Smile

Tuesday, February 1, 2011

Virtual Gallery - Gesture Recognition Gallery

The idea behind this project was to create a gallery that could be controlled without mouse/keyboard. The operator can define markers and then use them to control the whole gallery. There are gestures for zooming, moving to next image etc.

The main library used in this project is called touchless and was created by Microsoft. A brief description can be found here:
http://sites.google.com/site/bkosarzyckiaboutme/Touchless.pdf

We used C#, .NET and new WPF GUI to make it shiny ;) The application consists of two main parts. The first part is executed at launch. One can define markers and check camera image at this point. We can check marker acquisition quality and other properties. The second part launches after pressing "launch gallery" button. This part is written in WPF. One can navigate using keyboard/mouse or GESTURES :).

Notes on markers:
--------------------
Best markers are of bright/lurid color. There is no golden rule but a marker has to be easily distinguished from the environment. REMEMBER: you need two markers - the application has to distinguish between them as well. You can use red LEGO block and a blue LEGO block. Try wearing black shirt while experimenting - it can help.

Usage:
--------------------
- Launch the application
- Press "add a marker" - the image freezes - you can select marker now
- Press a LMB on the center of the marker and drag to the outer end of the marker (the application draws an invisible circle around the marker)
- Add a second marker
- Press "launch gallery" (you can launch the gallery without adding markers or having camera image)
- Press "launch gallery" in WPF - it loads images in $APP_EXEC_PATH$/images
- Navigate with mouse/keyboard or gestures

Keyboard shortcuts:
---------------------
Esc - back/exit
left/right arrow - rotate
up/down arrow - zoom in/zoom out
page up/down while in single image - previous/next image
page up/down while in gallery - previous/next page of images

Gestures dictionary:
---------------------
COMING SOON :)  - see video sample for now.

Video on youtube demonstrating the project:
http://www.youtube.com/watch?v=TRDJFmUs3IY

Gallery of images:
-----------------------


Executable version 32-bit Windows:
http://sites.google.com/site/bkosarzyckiaboutme/VirtualGallery_BIN_20081123_1608.rar

authors: Bartosz Kosarzycki, Łukasz Rek

Semantic Data Acquisition from Wikipedia

We've created a group of three developers: Anna Cudzich, me (Bartosz Kosarzycki), Sławomir Wałkowski and started working on Semantic Data Acquisition project at PUT. The idea was simple - get data from Wikipedia and convert it to an ontology (RDF file). We wanted to benefit from the structure of Wikipedia - like tables with preformatted data. We focused on just a few basic fact on American Inventors:
- name
- date of birth/death
- place of birth/death
- native american or immigrant
- inventions

The first step was to download wiki page content as described here:
http://kosiara87.blogspot.com/2011/01/wget-downloading-web-page-content.html

Then we:
- parsed HTML files to get: *.out (with text info on inventors) and *.table (with structured HTML table data)
- got rid of all trash along the way (empty spaces, white characters etc)
- written a parser to get desired info from strings of text (*.out) and *.table and merge it together. We differentiated word types - nouns, verbs, pronouns etc to get better quality of information.
- created an ontology (written an XML file in RDF with appropriate info)

The file can be loaded with TWINKLE tool:
http://www.ldodds.com/projects/twinkle/

We used SPARQL to retrieve information from RDF. SPARQL is a query language defined by w3c for RDF files. more info here:
http://www.w3.org/RDF/

Sample queries in SPARQL:

just get the surnames of inventors:
------------------------------------
prefix inv: <http://www.cs.put.poznan.pl/inventors/#>
SELECT ?surname
WHERE
{ ?x inv:surname ?surname }

Get some more info:
----------------------------
prefix inv: <http://www.cs.put.poznan.pl/inventors/#>
SELECT ?place ?firstname1 ?surname1 ?firstname2 ?surname2
WHERE
{
?x inv:firstname ?firstname1 .
?x inv:surname ?surname1 .
?x inv:wasbornin ?place .
?y inv:surname ?surname2 .
?y inv:firstname ?firstname2 .
?y inv:wasbornin ?place
}
ORDER BY ASC (?surname1)

To Count professions:
-------------------------
prefix sparql: <http://www.w3.org/2005/xpath-functions#>
prefix inv: <http://www.cs.put.poznan.pl/inventors/#>
SELECT (COUNT(sparql:lower-case(?profession )) AS ?total)  ?profession
WHERE
{
?x inv:profession ?profession
}
GROUP BY (?profession)
ORDER BY ASC (?total)


The project site at PUT can be found here:
http://semantic.cs.put.poznan.pl/dokuwiki/doku.php


technologies, IDEs and programs used: